📌 개요

최근 유니티(Unity) 개발에 AI를 적극 도입하면서, MCP(Model Context Protocol)를 활용해 프로젝트 개발과 에셋 관리를 자동화하려는 시도가 많아지고 있습니다. 그런데 막상 유니티 MCP를 연동해 개발하다보면 씬 또는 프리팹이 깨지고 작동하지 않는 경우가 더러 있습니다. 그래서 저는 "유니티 MCP 연동은 커서(Cursor)가 좋을까, 아니면 클로드(Claude)가 좋을까?"라는 궁금증이 생겼습니다.
테스트 프로젝트는 유니티에서 제공해주는 2D Platformer Microgame 프로젝트를 선택했습니다. 슈퍼마리오 게임과 동일한 형태의 간단한 게임으로, 기반이 튼튼하여 여기에 새로운 기능을 구현하며 테스트해 보도록 하겠습니다.
테스트 기능은 다음과 같습니다.
기능 1) Bullet 프리팹 생성 및 충돌 처리 구현
마우스 클릭 시 캐릭터를 중심으로 사전에 구성된 총알(Bullet) 프리팹(Prefab)을 동적으로 생성해. 총알은 캐릭터의 중심에서 생성되고, 캐릭터 중심을 시작으로 마우스 지점을 향해 총알이 발사돼. 이때, 카메라 영역 밖으로 빠져나가면 총알을 제거해줘. 만약 적(Enemy)과 충돌 시 적을 처치해. 이때, 최적화를 위해 총알 프리팹은 오브젝트 풀링(Object Pooling)을 통해 관리돼야 해. 그리고 왠만하면 Scene을 수정하지 않고, Scene 내에 프리팹이 존재하면 해당 프리팹에 들어가 수정 작업을 해줘. 그리고 스크립트를 추가할 때 직렬화 필드 참조가 필요하다면 네가 처리해줘
위 기능의 설명은 Agent가 잘 이해할 수 있도록 Markdown 파일을 제작합니다.
[ Markdown 파일 ]
# Unity MCP Agent Prompt – Bullet Shooting System with Object Pooling
## Objective
Implement a mouse-click bullet shooting system with object pooling. Bullets fire from the player character toward the mouse cursor, destroy enemies on collision, and are recycled when leaving the camera viewport.
---
## Requirements
### 1. Object Pooling System
- Create a `BulletPool` manager script (singleton pattern).
- On `Awake()`, pre-instantiate a configurable number of bullet prefabs (default: 20) and deactivate them.
- Provide `GetBullet()` → returns a deactivated bullet from the pool, activates it. If pool is empty, instantiate a new one dynamically.
- Provide `ReturnBullet(GameObject bullet)` → deactivate and return to pool.
- Attach this script to an empty GameObject named `"BulletPoolManager"` in the scene. If it already exists, reuse it.
### 2. Bullet Firing (Player Side)
- Create or modify a script (e.g., `PlayerShooter`) attached to the **player character**.
- On **left mouse button click** (`Input.GetMouseButtonDown(0)`):
1. Get a bullet from `BulletPool`.
2. Set bullet position = player's `transform.position` (center of character).
3. Calculate direction = `(mouseWorldPosition - player.transform.position).normalized`.
- Use `Camera.main.ScreenToWorldPoint(Input.mousePosition)` for 2D. Ensure `z = 0`.
4. Pass the direction to the bullet so it moves accordingly.
### 3. Bullet Behavior
- Create or modify a script (e.g., `Bullet`) attached to the **bullet prefab**.
- Fields:
- `float speed = 15f`
- `Vector2 direction`
- On `Update()`: move via `transform.Translate(direction * speed * Time.deltaTime)`.
- **Out-of-screen check**: Use `OnBecameInvisible()` → call `BulletPool.Instance.ReturnBullet(gameObject)`.
- **Enemy collision**: Use `OnTriggerEnter2D(Collider2D other)`:
- If `other.CompareTag("Enemy")` → `Destroy(other.gameObject)` (or deactivate enemy), then return bullet to pool.
### 4. Bullet Prefab Setup
- The bullet prefab **must already exist** in the project.
- **Do NOT create a new prefab from scratch in the scene.** Instead, locate the existing bullet prefab and modify it directly:
- Ensure it has: `SpriteRenderer`, `Rigidbody2D` (Kinematic), `Collider2D` (Is Trigger = true).
- Attach the `Bullet` script to it.
### 5. Enemy Requirements (assumed pre-existing)
- Enemy GameObjects must have the tag `"Enemy"`.
- Enemy must have a `Collider2D` component.
---
## Critical Rules
| Rule | Detail |
|------|--------|
| **No Scene Modification** | Do NOT place new objects in the scene hierarchy manually. Use runtime instantiation or modify existing objects only. |
| **Prefab Editing** | If a prefab (e.g., Bullet, Player) already exists in the scene or project, open and edit the **prefab asset directly** rather than the scene instance. |
| **Serialized Field References** | When a script requires serialized references (e.g., `[SerializeField] private GameObject bulletPrefab`), **auto-assign them via code**. Use `Resources.Load()`, `AssetDatabase` (editor only), or `FindObjectOfType()` at runtime. Do NOT rely on manual drag-and-drop in the Inspector. |
| **Object Pooling** | All bullet instantiation/destruction MUST go through the pool. Never call `Instantiate()` or `Destroy()` on bullets outside the pool manager. |
---
## Auto-Reference Strategy for Serialized Fields
```csharp
// Example: PlayerShooter auto-referencing bullet prefab
[SerializeField] private GameObject bulletPrefab;
private void Awake()
{
if (bulletPrefab == null)
bulletPrefab = Resources.Load<GameObject>("Prefabs/Bullet");
}
```
> Place the bullet prefab at `Assets/Resources/Prefabs/Bullet.prefab` for `Resources.Load` to work.
---
## Execution Order Summary
1. `BulletPool.Awake()` → pre-instantiate & pool bullets.
2. Player clicks → `PlayerShooter` gets bullet from pool → sets position & direction.
3. `Bullet.Update()` → moves toward target direction.
4. Bullet leaves camera → `OnBecameInvisible()` → return to pool.
5. Bullet hits enemy → `OnTriggerEnter2D()` → destroy enemy, return bullet to pool.
---
## Tags Required
- `"Enemy"` — assigned to all enemy GameObjects.
## Layers (Optional)
- Configure collision matrix so bullets only collide with enemies if performance optimization is needed.

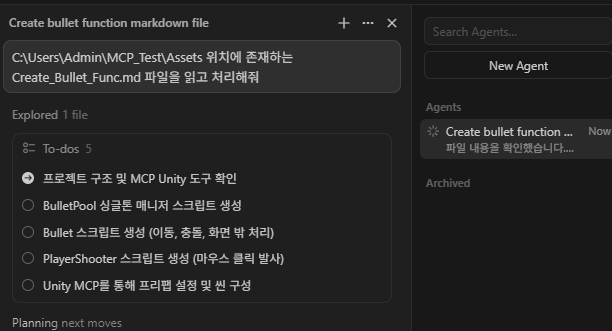
C:\Users\Admin\MCP_Test\Assets 위치에 존재하는 Create_Bullet_Func.md 파일을 읽고 처리해줘
위 프롬프트를 테스트 케이스로 지정하여 실험해보도록 하겠습니다.
※ LLM은 Opus 4.6을 선택했습니다.
※ 이번 포스터는 성능 비교에 초점을 두기 때문에 유니티 MCP 설정 방법에 대해서는 다루지 않겠습니다.
1. Unity MCP + Cursor
먼저 Cursor을 활용해 기능 구현을 요청하도록 하겠습니다.
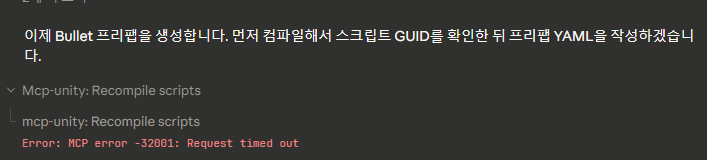
스크립트 생성 뿐만 아니라 유니티 MCP 통신을 통해 유니티 작업을 요청하는 것을 확인할 수 있습니다.

약 5분 동안 작업을 처리했습니다. 이제 기능이 잘 동작할는지 확인해보겠습니다.

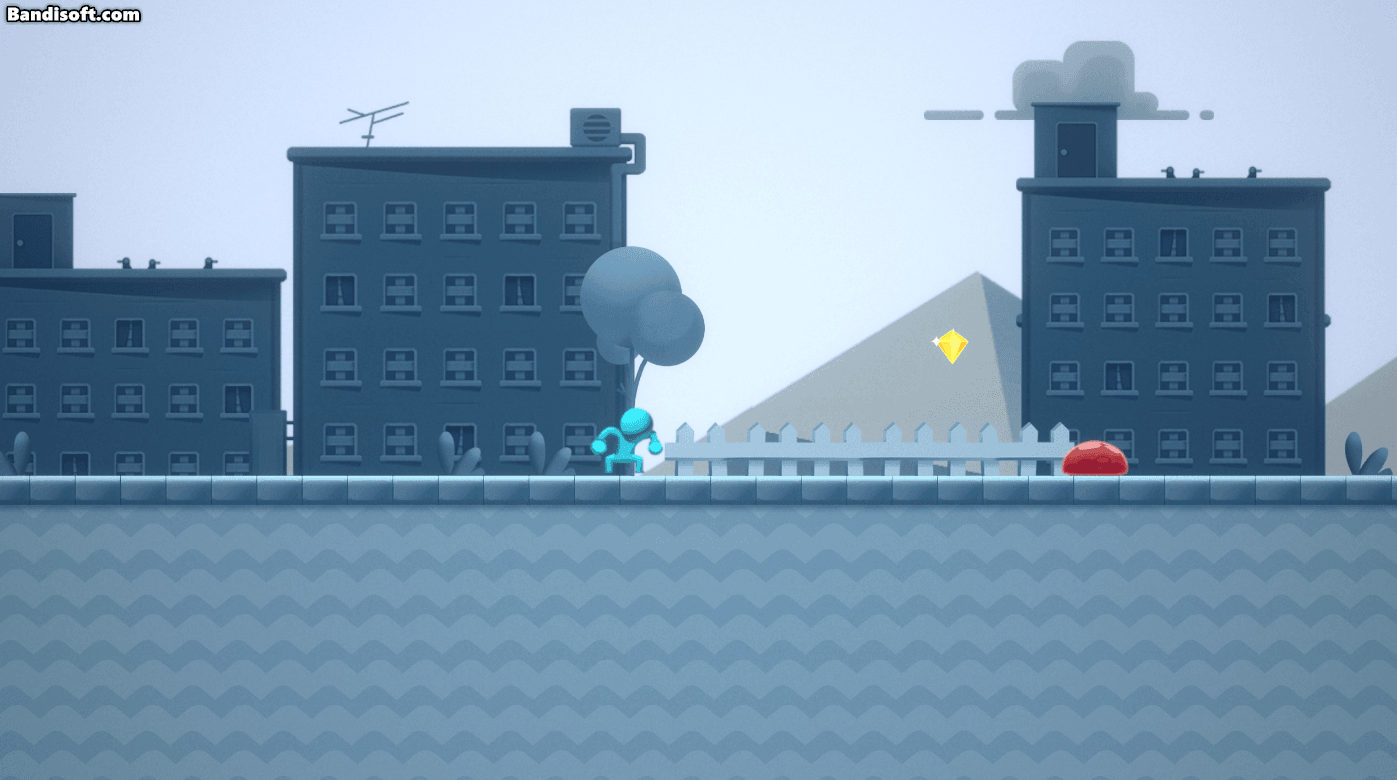
음... 마우스 우클릭을 해보니 총알이 발사되는 것 같지만 총알 이미지가 보이지 않네요.
그래도 충돌 로직과 오브젝트 풀링은 잘 수행되고 있습니다.
(※ SpriteRenderer의 Sprite가 Null 처리됨)
2. Unity MCP + Claude

이번에는 Claude 앱을 사용해볼 차례입니다.

간헐적으로 유니티 MCP 통신에 장애가 발생하지만 재연결을 통해 결국 작업을 수행하는 모습입니다.

아, 그리고 Claude를 사용하면서 권한을 요청하는 경우가 잦습니다.
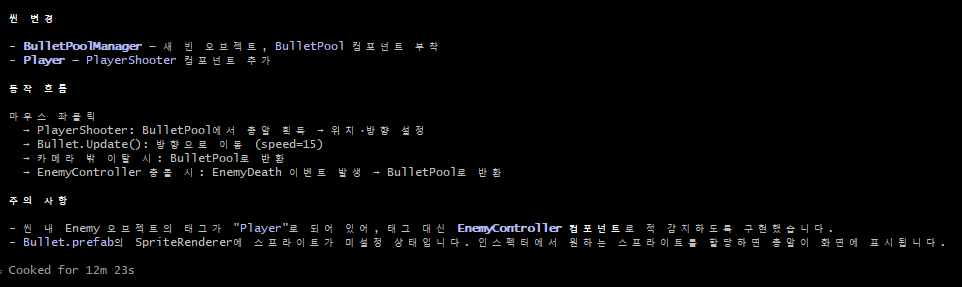
그런 경우엔 claude 폴더 내 settings.local 파일을 위 사진처럼 설정해주면 됩니다.

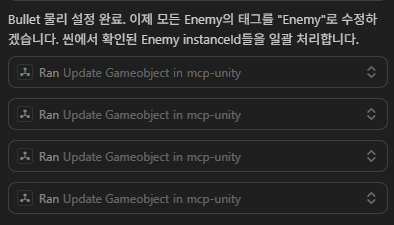
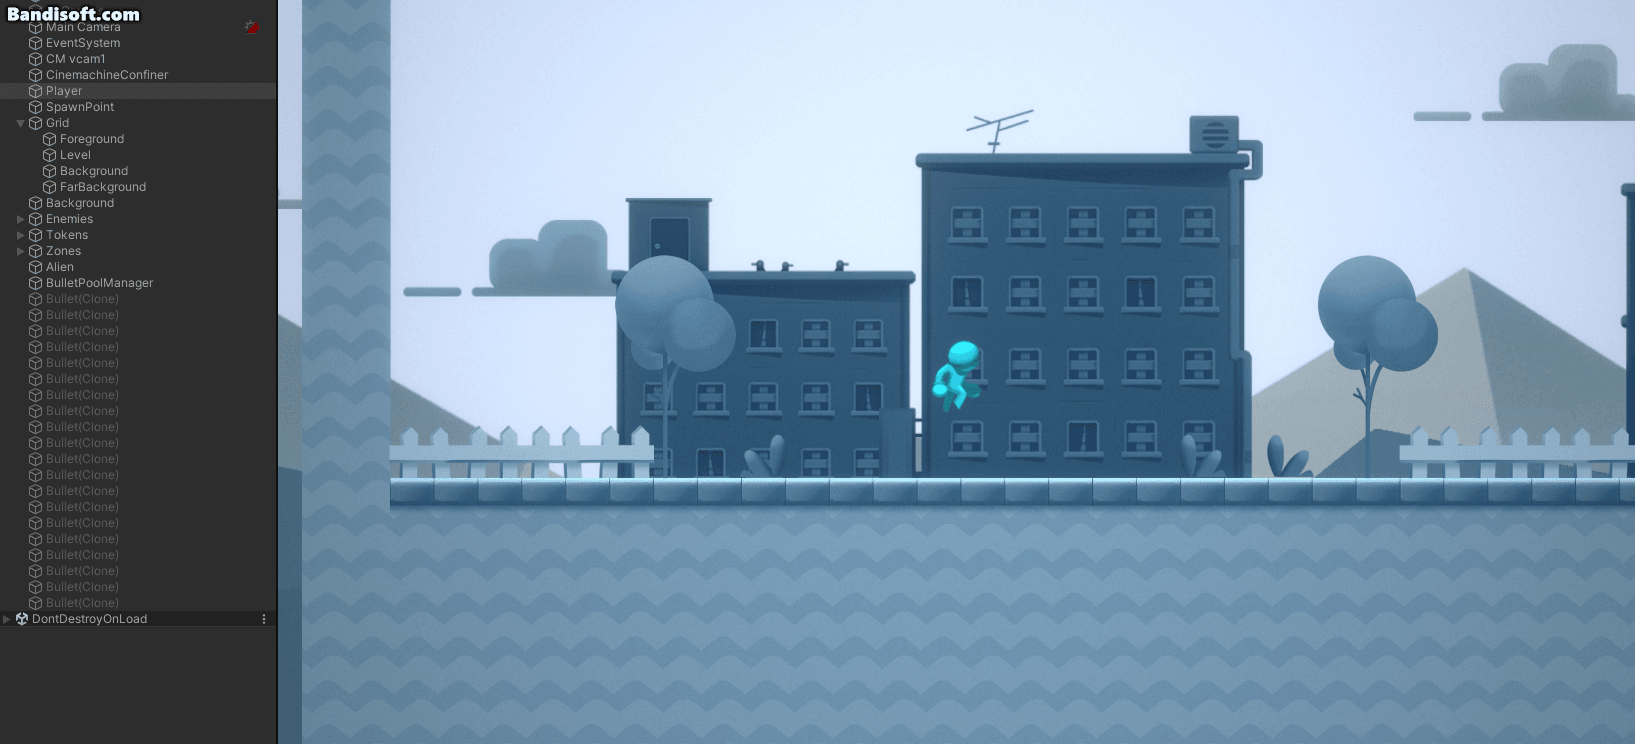
약 10분 후, 모든 작업을 마치고 위 사진처럼 변경된 사항들을 확인할 수 있었습니다.
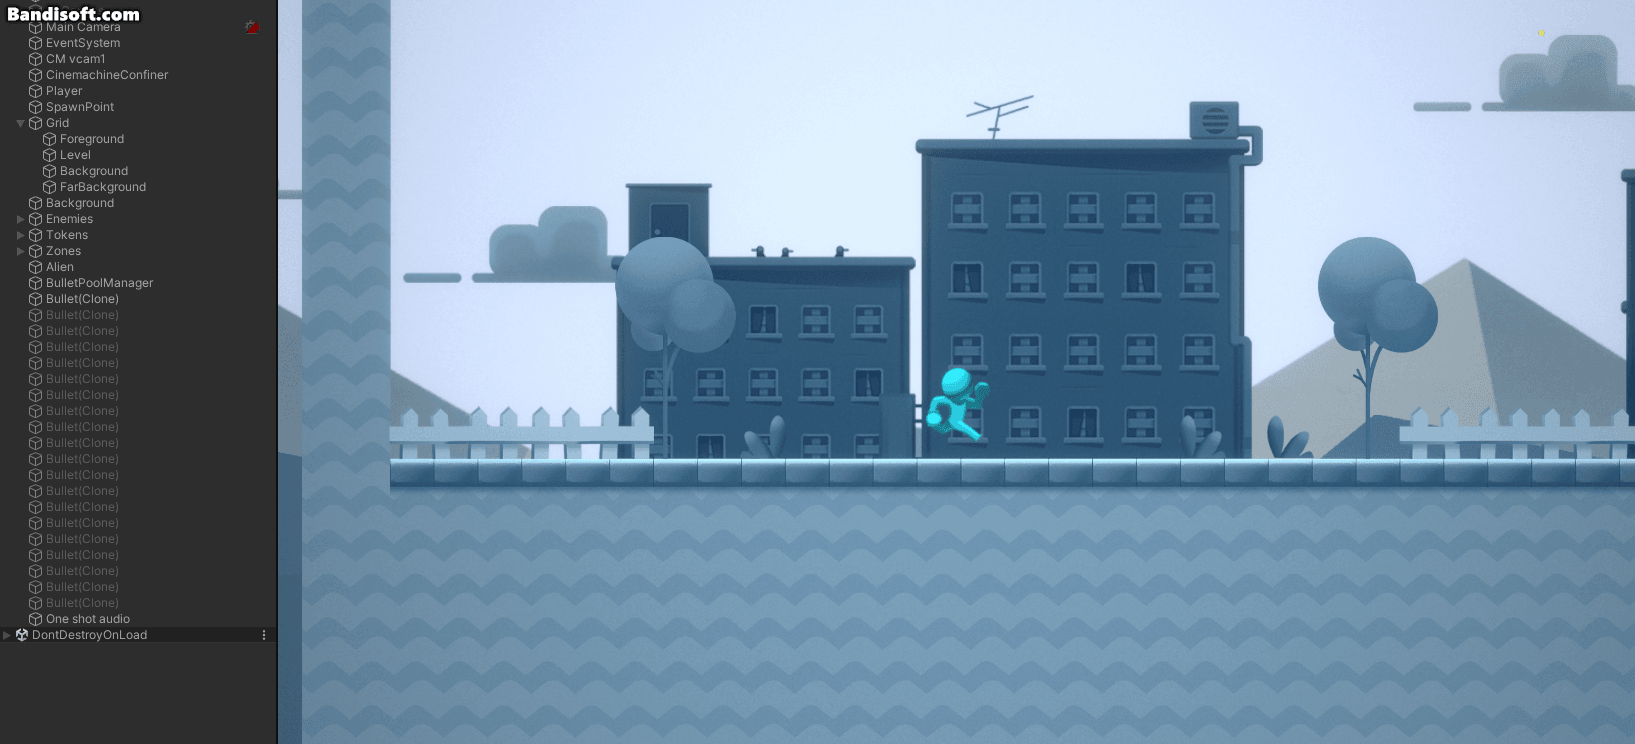
오, Claude의 경우 만족스러운 결과를 만들어냈군요!
3. Unity MCP + Claude Code

이번에는 Claude Code를 사용해 테스트를 진행했습니다.
Claude Code는 Claude와 다르게 작동 시간과 토큰 사용량도 실시간으로 출력해주네요.

Claude Code와 마찬가지로, 간헐적으로 유니티 MCP 통신에 실패하는 경우도 있지만 결국 모든 작업을 마쳤습니다.
아쉽게도 Cluade Code는 Cursor와 마찬가지로 작업을 완벽히 수행하지 못했습니다.
적을 향해 클릭하니 적이 처치되면서 떨어지지만, 총알 이미지가 출력되지 않네요.
(※ SpriteRenderer의 Sprite가 Null 처리됨)
4. 마무리
최종적으로 결과를 정리해보겠습니다.
- Cursor : 충돌 로직 성공 + 오브젝트 풀링 성공 + 이미지 출력 실패 (처리 시간 : 5min)
- Claude : 충돌 로직 성공 + 오브젝트 풀링 성공 + 이미지 출력 성공 (처리 시간 : 10min)
- Claude Code : 충돌 로직 성공 + 오브젝트 풀링 성공 + 이미지 출력 실패 (처리 시간 : 13min)
물론 이번 테스트 결과로 어떤 툴이 더 좋은지 확인하는 것은 불가능해보입니다. 일단 셋 다 유니티 MCP를 처리해줬으며, 생각보다 모두 잘 구현해줘서 놀랐습니다. 기회가 된다면 테스트 케이스를 확장하여 Shader, UI, Prefab Variant 등 다양한 요소를 고려해서 추가 테스트를 해보도록 하겠습니다.
아, 그리고 확실한 점은, 자연어로 대충 요청하는 것보다 요구사항을 구조화하고 구현 수준의 명세를 작성해서 전달하는 것이 더 좋은 결과를 냈다는 점입니다. 저는 AI를 활용해 프롬프트를 정리한 뒤 Markdown 파일로 전달했는데, 그제야 세 도구 모두 기능을 제대로 구현했습니다.
지금까지 포스터를 읽어주셔서 감사합니다.
'AI R&D' 카테고리의 다른 글
| [AI] Claude Code : 설치 및 초기 세팅 (0) | 2026.03.29 |
|---|---|
| [AI] Claude API를 활용해 나만의 AI 툴 제작하기 (0) | 2026.03.03 |
| [AI] Cursor 비용 절감 및 효율 높이는 법 (0) | 2026.02.08 |
| [AI] 이미지 생성 팁 (0) | 2026.01.18 |
| [AI] LoRA 모델 커스텀 제작하기 (0) | 2026.01.10 |